Posts

Showing posts with the label adult supervision needed

Paper Pulp Dinosaur Chimeras

Image
  Hello and welcome to our last Family Saturdays at Home. Today we’re going to be making a paper pulp mixture and using it to sculpt dinosaur chimeras. You will need: - Shredded paper - Salt - Flour - A kettle - A hand blender If you don’t have a hand blender it might be a good idea to repeat the paper soaking process over a couple of days.  You can use torn up newspaper if you don’t have shredded paper. To make your paper pulp get a grown-up to cover the paper shreddings with boiling water and leave it overnight. After leaving it to soak for 24 hrs use the hand blender to break it up into a pulp. Make sure to get a grown-up to help you with this bit. Next, squeeze out all the liquid from your pulp so that it looks like this and add flour until you get a mouldable dough consistency. Design your dino chimera from parts of other dinosaurs. Lay out your mixture and then start to sculpt, just like clay! Leave to dry - I put cardboard under the bits that needed support and added ce...
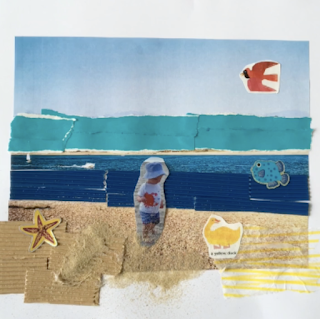
Imagined Landscaped

Image
  Hello and welcome to Mini Makers at Home! In this session we will take inspiration from our favourite picture books, along with our favourite people and places, to create an imagined landscape. You will need: - Photos/magazines - Paper - Glue - Scissors - Stickers and other things to decorate!     

Nature Play

Image
Hi everyone! The theme of this post is The Natural World. So what we are doing is using clay and natural objects to create playful sculptures. Remember to pick any plants or flowers responsibly and don't forget to share your creations with us!      You will need: - Clay - Leaves - Sticks - Stones          

Embossing with Jordan

Image
Hi everyone! Jordan here, I hope you are all well! In this post, we will be making a family timeline using custom motifs that represent ourselves and embossing them. Scroll through to find out how to make it! You will need: - Thick paper or card - Scissors - A spoon - Pen - Tape As well as these items, we need to use a clean kitchen or bathroom sink. TOP TIP! This process works best on thicker paper! Soak your paper to soften the fibers. Fill your clean sink with water about a finger's depth will suffice. Fully submerge your paper into the water and soak for a minimum 10 mins. You may want to add a timer. Note! You may want to get stages 2 to 4 done within this 10 minute or so time scale. If not just leave your paper in the water until you are done. On your cereal box card draw your motif out 3 times. TIP! It’s best to keep your shape super simple, try to translate your image into a silhouette with clean edges as seen in the image. Once drawn out cut out all 3 symbols and glue / ta...

Collage Characters with Abi

Image
Follow this post to make some cut-and- paste  collage characters inspired by the artwork of Hannah Höch .          You will need:  - Magazines - Scissors - Card  - And glue if you want to keep your characters       Cut out eyes, noses and mouths from some old magazines. These can be any size and if you don't have any magazines you're able to cut up, you can print off some  Arrange them to make faces. Move the features to change their expressions. Don ’ t forget to share your artwork with us by tagging on Instagram @aspex_takepart and using the hashtag #AspexatHome.

Collage Old Art

Image
In this post, we are going to be making collages by reusing our old artwork!  You will need: - Old artwork you don't mind cutting up - Scissors - Glue - Paper to collage on I made some collaged plants as an example but you can make anything you like by cutting, tearing and sticking some of your old paintings and drawings.        Look at your old artwork for your favourite bits, or bits that work together. Try looking for pictures in abstract pieces of work. I decided to use the green paintings to make a picture of this plant. I used a cereal box for the plant pot. This is what it looks like all put together! Here are some more plants I made from my old paintings. Don ’ t forget to share your artwork with us by tagging @aspex_takepart and using the hashtag #AspexatHome

Leaf Bunting with Abi

Image
Follow this post to bring some of the outside inside by decorating your home with some leaf bunting! Use leaves you find on your walk or in your garden to make some natural bunting. You can also try experimenting with other natural things such as flowers, feathers or even shells.         You will need:  - Leaves or other natural things such as flowers, seeds, twigs etc.  - A large-eyed needle - String. Use a large-eyed needle to thread your leaves onto the string.  If you don’t have a needle use a pencil and Plasticine instead.         Tape the end of your string to help threading. Tie a knot between each leaf. And you're done!         Use your bunting to decorate your home!  Share your artwork with us by tagging @aspex_takepart and using the hashtag #AspexatHome

Tea Bag Painting

Image
Hi everyone! In this post, we’re using herbal and fruit tea bags to paint with and some other things from around the kitchen to create different effects. You will need: - Tea bags - Paintbrushes - Paper - Mugs and hot water      Pour hot water into your cups as if you were making a tea. Make sure an adult help you with this! Now you can paint using the tea with a brush if you have one, or use the tea bag. Make sure you wait until the tea has cooled to use it! The colours look a little different when they have dried. Use lemon juice to change the colour and create a tie-dye effect. The tea I’m using here is the cranberry and raspberry. This effect was made using table salt and salt flakes. Don ’ t forget to share your artwork with us on Instagram by tagging @aspex_takepart and using the hashtag #AspexatHome - we’d love to see what you make!